Immersive Mic Array and Blackmagic Ursa Cine Immersive Camera
GOAL
To compare various multi-channel microphone techniques including immersive spaced array (PCMA-3D), Ambisonics, Decca Tree, and AB Stereo Pair in a controlled setting. With particular focus on the immersive performance of the PCMA-3D Array vs 1st Order Ambisonics. Key questions – how large is the gap between a $22,000 microphone array and a $1,600 Ambisonics mic? Is the gap large enough to justify purchasing the more expensive solution? Is that gap purely aesthetic? Is there a gap at all?
Another core goal of this project was to create an immersive experience for the Apple Vision Pro including both immersive audio and video. So, in addition to the scientific comparison, there is also an important deliverable component to this project. Thoughts on that process can be found in a future post (link to follow soon).
PROJECT DETAILS
A live performance of Mozart’s Piano Quartet in Eb Major. Instrumentation: piano, violin, viola, and cello. Recorded in the Audio Temple at Full Sail University in Orlando, FL in October 2025. Darren Schneider was the supervising engineer with Meredith Douglas assisting. Blackguard Sound oversaw the immersive component, capturing both immersive audio and video using the Blackmagic Cine Immersive camera. Special thanks to Eric Jacobsen and the rest of the ensemble for allowing us to record their wonderful performance.
TL: DR COMPARISON TABLE & TAKEAWAYS
This post is admittedly quite long. Here’s a quick comparison and our key takeaways. We’re spoiling a bit right at the beginning, but please read on after the TL: DR section if you want all the specifics.

Comparing the Schoeps PCMA-3D V1 array with the Sennheiser AMBEO
The Schoeps PCMA-3D array is the gold standard when sound quality is all that matters. The added expense and more complex setup are justified for ultra-discerning clients with a suitable budget in controlled environments. The AMBEO (or a similar fully coincident, Ambisonics array) is a perfectly suitable option when there are other considerations at play, like when a smaller physical footprint is required, when setup time is a concern, or when budgetary constraints don't permit the PCMA-3D.
The tonal differences between the two options come down to a matter of taste - we felt the AMBEO was better suited to a production that included video as it more realistically captured the performance but that the PCMA-3D array (with it’s flattering portrayal of the instruments) lent itself better to a purely auditory immersive experience. The differences in immersive quality are minor, and smaller than we expected. We felt the AMBEO actually outperformed the PCMA-3D on one of the three spatial axes. The common wisdom of Ambisonics mics having a smaller sweet spot may be overstated. We didn’t perceive a notable reduction of the sweet spot, but this was only achievable through careful mastering using state-of-the-art tools. (See the section below: ‘A Note on Processing Ambisonics Recordings’)
In our opinion, the PCMA-3D array is superior, but we don’t think it’s a 10x improvement, or even a 2x improvement. More like a 1.2 – 1.5X improvement. Of course, all of this is highly subjective which is why we’ve included files to perform your own analysis. All things considered, the AMBEO performed very well, but with the caveat that it took a lot of work and a suite of Audio Brewers (and other) plugins to get there. In our estimation, the post-processing performed on ambisonics recordings is as important as the mic itself. An ambisonics mic alone is practically useless. It’s impossible to overstate the importance of a proper plugin suite and careful mastering process!
OK, now to the details…

Another angle on the setup.
BACKGROUND
We’ve been immensely curious about the PCMA-3D microphone array (v1), which was developed by Dr. Hyunkook Lee of the Applied Psychoacoustics Lab (APL) at the University of Huddersfield. The array consists of 11 microphones arranged in two height layers that are horizontally spaced but vertically coincident. A special area of interest for us is how this immersive recording method compares to fully coincident techniques (Ambisonics), which we are familiar with from our field recording work. Of course, we’ve read about the differences between spaced and coincident microphone arrays but there is no substitute for first-hand experience and a trained set of human ears.

Vertically coincident pair
Immersive microphone arrays are expensive! When this opportunity came up, we elected to rent a set of Schoeps mics for the PCMA-3D Array from SoundMirror in Boston. SoundMIrror is our go-to source for high-end or obscure microphones, and we highly recommend them for your rental needs. An aside on Schoeps mics – these are just about the only mics you ever see in these types of arrays. There are other options on the market (see our previous blog post comparing some of the options), but we went with Schoeps for two reasons: 1. Before experimenting with other models of mics, we wanted to somewhat control the experiment by using the established industry standard. 2. Schoeps won our mic shootout (even if the outcome was closer than we initially expected).
The Decca Tree and AB Pair were primarily for reference, as those are well-established mic techniques for classical music. Comparing the immersive arrays with stereo techniques will give us an even more complete picture. Ultimately, we elected to use the Decca Tree in the final mix, so it was worth it!
EQUIPMENT LIST
PCMA-3D Array (v1)
5x Schoeps MK-4 Cardioid
6x Schoeps MK-41 Super Cardioid
RME 12Mic Dante Preamps
Triad-Orbit modified Decca Tree stand
Ambisonics
Sennheiser AMBEO 1st Order Ambisonics Mic
Sound Devices MixPre 6 Field Recorder
Decca Tree
3x Austrian Audio OC818
SSL Duality into Pro Tools
AB Stereo
2x Schoeps MK-21 Wide Cardioid
SSL Duality into Pro Tools
CAPTURE METHODOLOGY
The instruments were arranged in the typical piano quartet fashion. Piano in the back with strings in the foreground. Arranged left to right: violin, viola, and cello. The reference location for our immersive test was twelve feet in front of the strings (eighteen feet from the piano) centered on the viola, which represented the center line of the ensemble. At this location, we aligned the center channel microphones of the PCMA-3D array and the Decca Tree. The Decca Tree was placed at approximately eight feet in height, with the PCMA-3D array at about seven feet. Under the center channel mics, we placed the AMBEO at about six feet. Finally, the AB stereo pair was centered on this point at about six feet high.

Immersive Mic and Camera Placement Detail
The immersive camera was placed between the microphone arrays and performers, about eight feet from the strings, centered on the viola. The tripod was set so that the camera was about five and half feet high (rough approximation of average human height).
To ensure matched gain, the PCMA-3D Array was amplified with the RME 12Mic Dante, a 12-channel preamp with linkable, digitally controlled gain. From there, 11 channels were recorded into Pro Tools.
The AMBEO was amplified by a Sound Devices MixPre6 running the Ambisonics plugin. The raw A-format was transcoded live in the MixPre6 and recorded in AmbiX format. Once again, all four gains were linked and digitally controlled.

Immersive Recording with RME 12 Mic Dante and Sound Devices MixPre 6
The Decca Tree and A/B Stereo Pair were amplified by the Audio Temple’s SSL Duality console (with no ability to match gains, other than by ear) and recorded into Pro Tools along with the close mics for each instrument (a stereo pair of Neumanns on the piano, DPA pencil mics on the strings). The close mics were for mixing but aren’t relevant to this comparison.
All channels were recorded at 48K / 24-bit.
PRO TOOLS SESSION SETUP
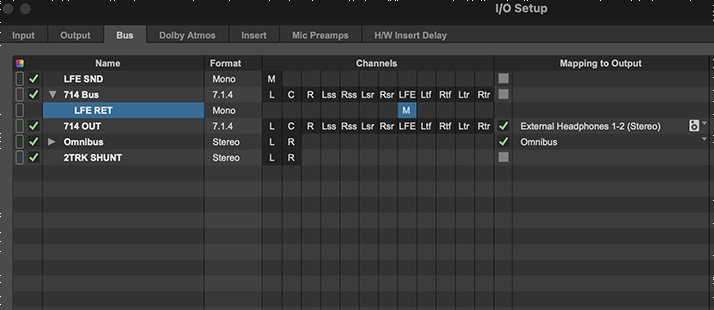
All 25 microphones were imported into a unified Pro Tools session for mixing and comparison. The respective arrays and pairs were panned, grouped, and subbed together. Every element was bussed into a 9.0.6 Object Bed and sent to the Dolby Atmos Renderer. The output of the Dolby Renderer was monitored in 7.1.4 at Blackguard Sound.
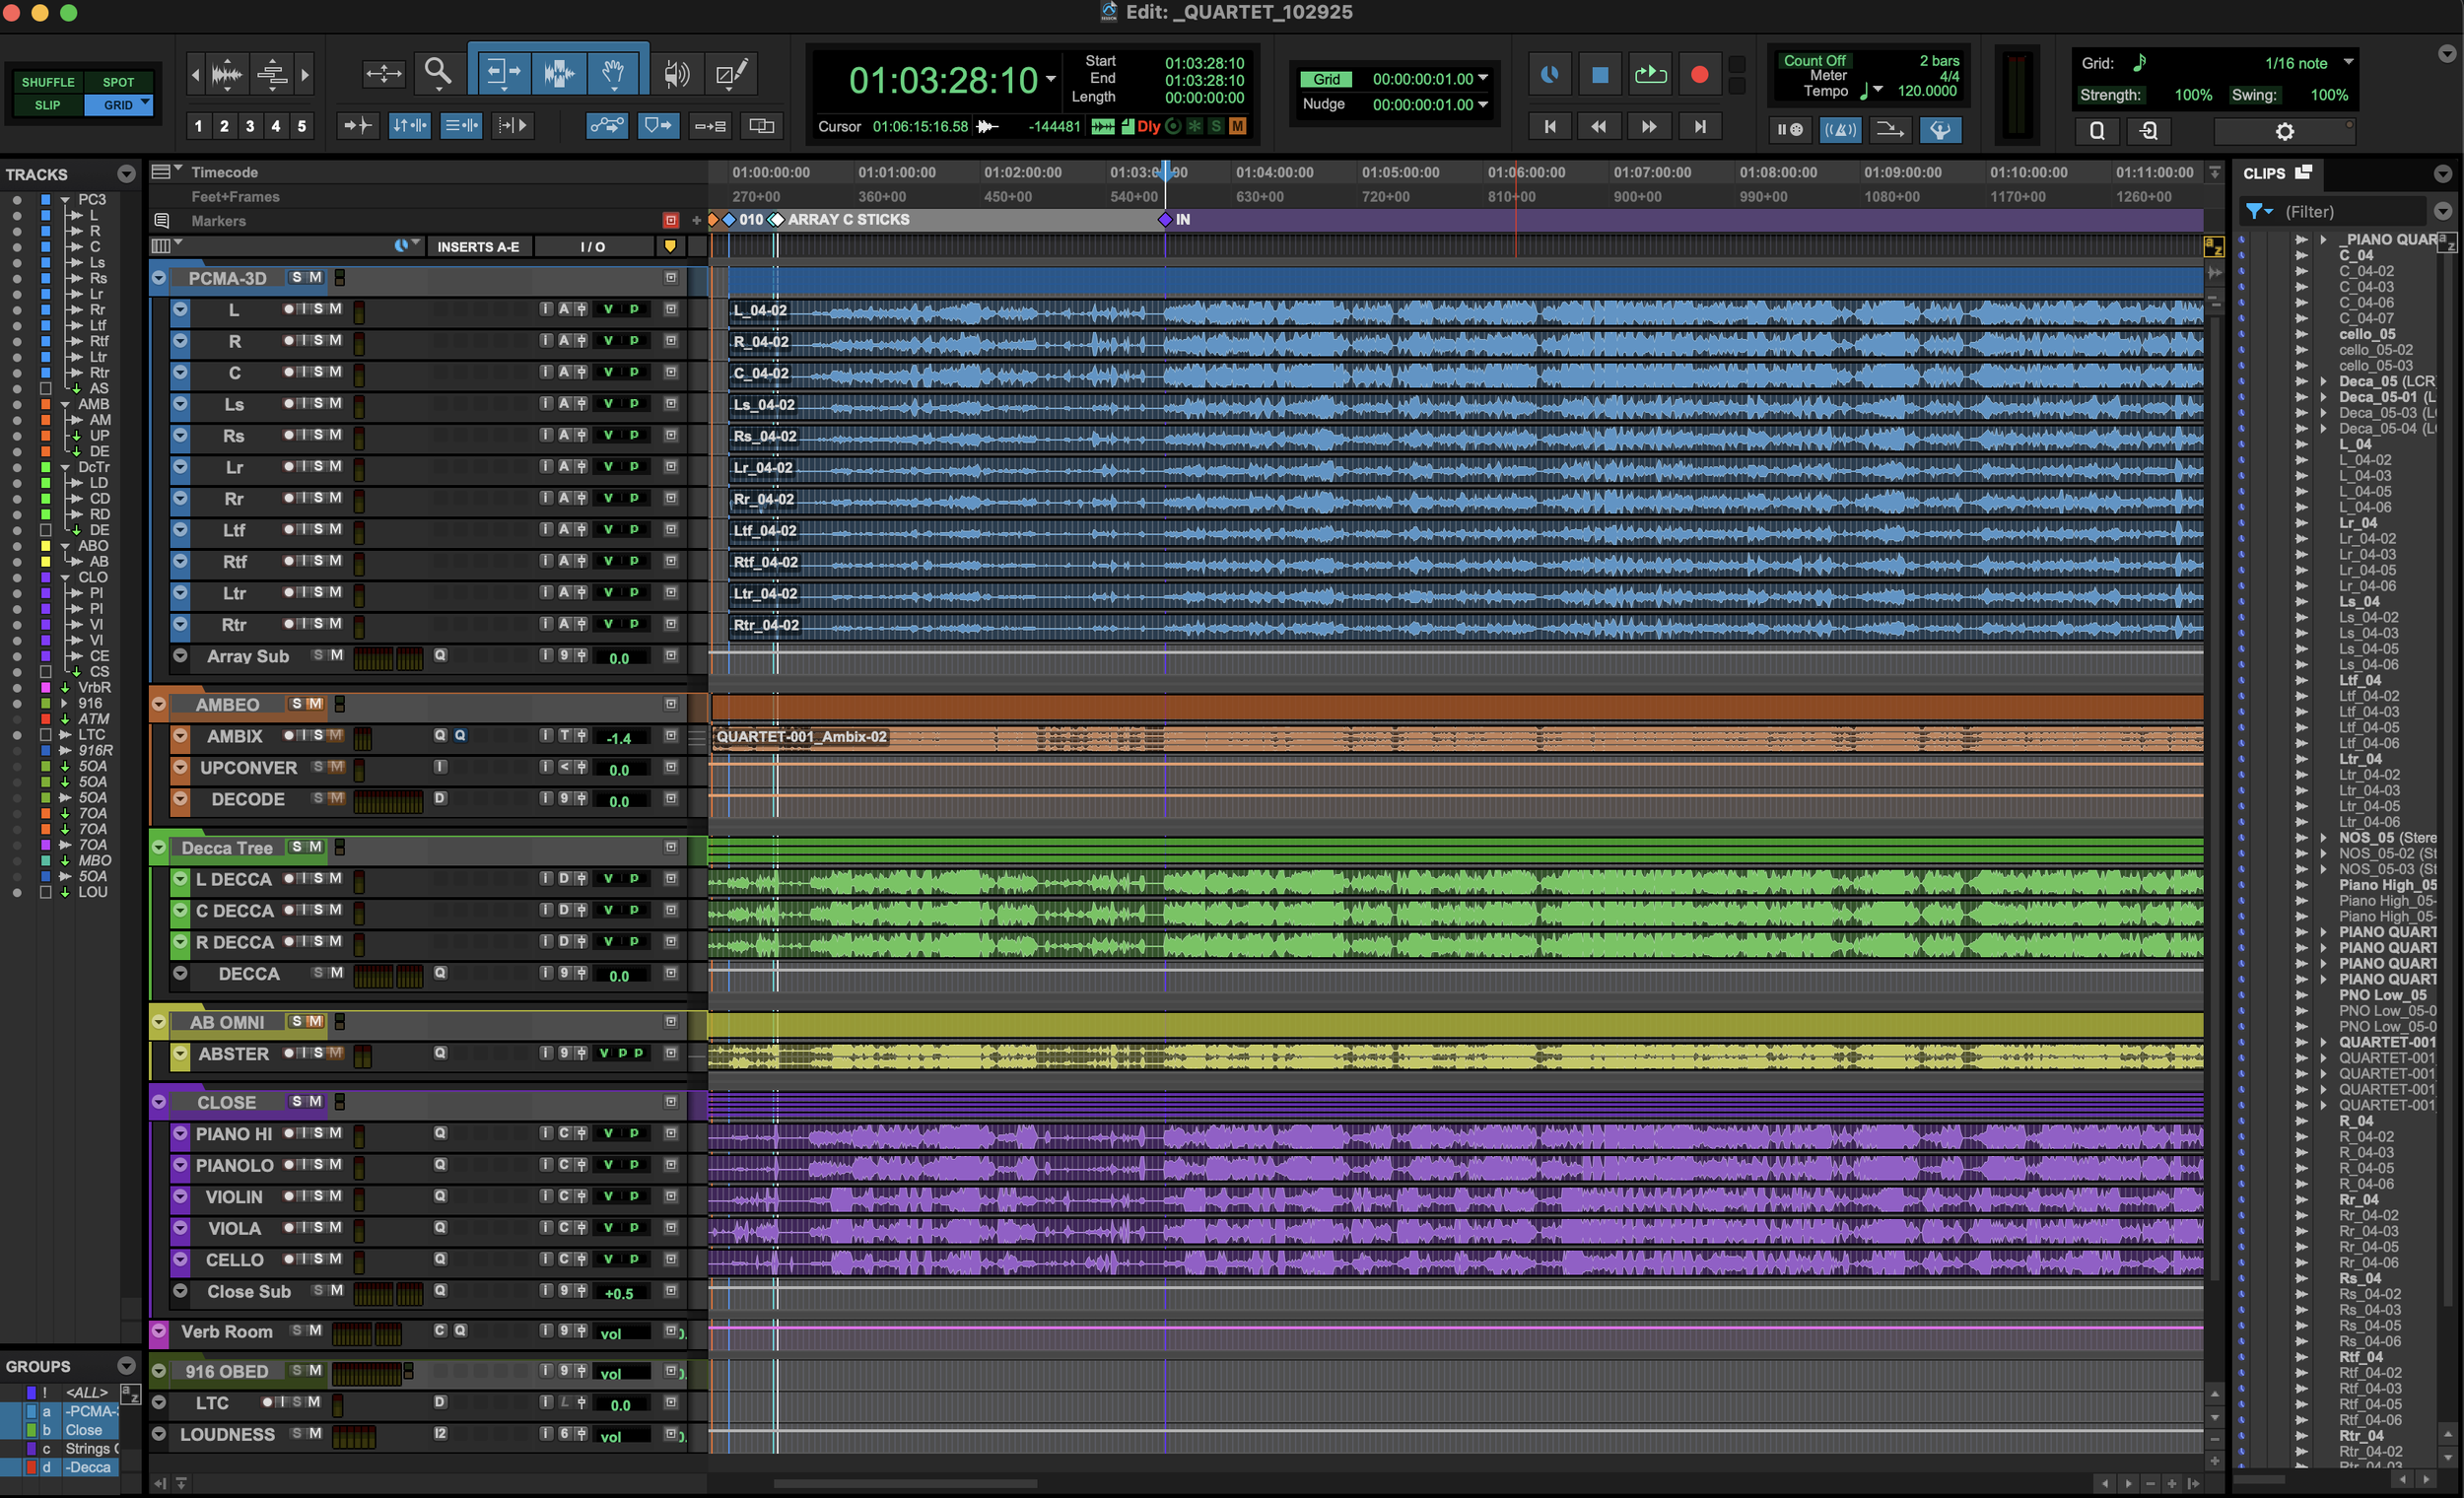
Screenshot of mix session in Pro Tools (PCMA-3D in blue / AMBEO in orange / Decca Tree in green / Stereo A/B in yellow / Close mics in purple)
Each microphone array / pair was time-aligned to the camera perspective. The center channels of the PCMA-3D and Decca Tree arrays were used for reference, with the time of arrival differences between each mic in the array preserved.
The AMBEO was upscaled and decoded using Audio Brewers plugins. First, the 1OA recording from the MixPre6 was upscaled to 7OA using ab HOA Imager and Upscaler (yes, the Advanced Upscaler does this internally, but in cases like this I prefer to have the full spatial control that the Imager provides). Then it was decoded to 9.0.6 using ab Decoder HOA and fed into the Object Bed with the other mics.

Audio Brewers Imager and Decoder processing the AMBEO
Each microphone array / pair was clip gained to -20LKFS (using meters in the Dolby Renderer as my guide) to ensure a fair comparison. We’re all familiar with the effect of ‘louder is often perceived as better’ so care was taken to ensure an honest comparison.
PROCESSING
Each microphone array / pair was equalized using FabFilter ProQ4 across their respective sub auxes (this could be stereo, LCR, 7.0.4, or 9.0.6 depending on the mics in question). The first EQ pass was done to taste with no attempt to EQ match between the groups. The EQ was strictly subtractive – mostly clearing up excessive low-mid room resonances in the piano and taming some of the shriller high-mid resonances in the strings. Spectral and Dynamic EQ settings were employed to remove the offending frequencies as surgically and transparently as possible.
The PCMA-3D array needed the most help with the piano buildup. We chalk this up to having 11 mics and thus 11 times the buildup. To accomplish this, we created a sidechain bus consisting of the close piano mics. This sidechain bus controlled the behavior of the spectral EQ on the array, serving to reduce some of the loudest frequencies of the piano specifically, while leaving the low end of the cello alone for the most part.
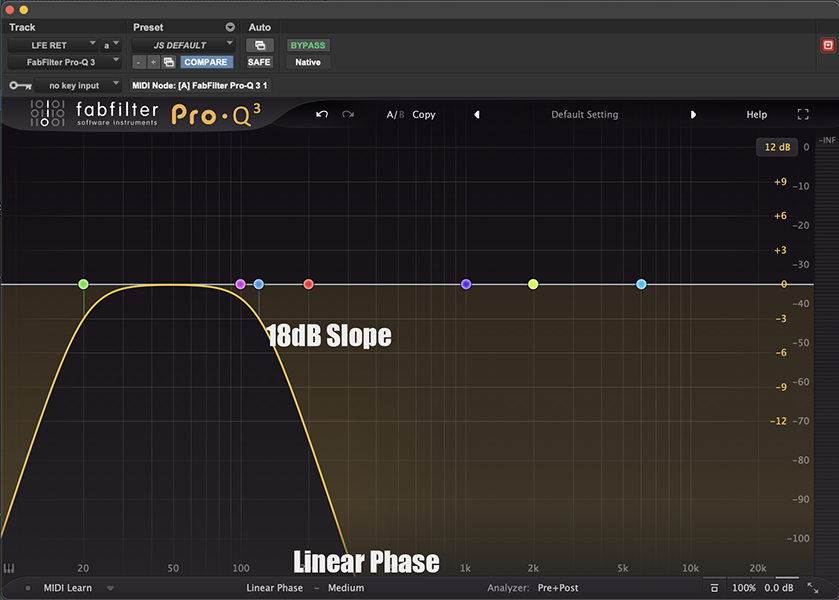
A NOTE ON PROCESSING AMBISONICS RECORDINGS
As always, utmost care should be taken when working with Ambisonics recordings. I typically EQ my Ambisonics recordings before upscaling. To preserve the best possible spatial imaging, plugins should be in linear phase mode and any processing applied needs to be identical on each channel. This means the plugin must be in multichannel mode (as opposed to multi-mono).
As many of us working with Ambisonics know, FabFIlter does not support Ambisonics channel widths in multichannel mode. For basic EQ, this is not a problem. The same processing will be applied to every channel. However, when using dynamic EQ (or any dynamics processing for that matter) this raises serious issues. In multi-mono mode, each channel will be processed independently based on their individual amplitudes, and the gain reduction will be dramatically different between one channel and the next. One way to observe this in ProQ 4 is to open the ‘instance list’ view where you can see the mono processing on each channel. Make an EQ band dynamic, turn on the gain reduction, and observe as each channel does its own thing. Not good.
Dynamic EQ Misbehaving in Multi-Mono Mode
However, there is a work-around that makes this workflow possible. Sidechaining is the key... (See what I did there?) My method is to duplicate the 1OA track and route it to a dummy output. Then I create a mono bus called ‘ambisonics key’. Put that bus on a send of the dummy Ambisonics track and set the send level to unity. Next, go to the ProQ 4 instance inserted on the non-dummy Ambisonics track. Set the sidechain input to the bus you made (this is in the plugin header, top left). Then, go to the band that you want to use dynamically. Open the disclosure triangle and click the icon to enable sidechain input. Set the threshold and gain reduction controls to taste. Finally, open the ‘instance list’ view and observe how all the channels of the multi-mono plugin are now reacting in tandem!

Relevant FabFilter Pro Q4 controls
ProQ 4 in Sidechained Multi-Mono Working in Tandem
That was a bit of a detour, but crucial to understanding how to make a fair comparison by not destroying the spatial image in the Ambisonics recording. The AMBEO needed its typical cleanup in the 400-500 Hz range. I consistently scoop out 3dB fairly broadly in this area. This is simply parametric EQ (no dynamic or spectral processing) and I have to do it on every recording I make with the AMBEO. If the mic has one sonic flaw, it’s this. But once you know about the issue, it’s easy to address. Then I applied more advanced EQ techniques to suppress resonances - similar to the processing on all the other mics.
MATCHING THE IMMERSIVE RIGS
The most important aspect of this exercise was to formulate a comparison between the two immersive techniques. This meant matching them as closely as possible in both the frequency and spatial domains. I decided to use the PCMA-3D array as the control since, in my estimation, the AMBEO would need to punch up to get to the same level. With repeated A/B comparison, I tweaked the EQ of the AMBEO to be in the ballpark of the PCMA-3D. Then, I focused on the spatial aspects. I manipulated the width, depth, and omni controls in ab Imager to approximate what I was hearing on the PCMA-3D. I feel I was able to get them close enough to formulate an opinion.
EXAMPLE AUDIO
Here is a Dolby Atmos ADM containing a few example clips comparing the two immersive microphones. Note that this is not representative of the final mix for consumption in the Vision Pro - this is presented more ‘straight up’ for comparison. Each snippet is played twice. The first play-through is the Schoeps PCMA-3D array and the second is the Sennheiser AMBEO.
And here is a binaural re-render for those who don’t have a way to play back the ADM.
The provided audio files are for demonstration purposes only and are the intellectual property of Blackguard Sound, Eric Jacobsen, and Full Sail University. No unauthorized use is permitted.
CONCLUSION
Our big takeaways:
The PCMA-3D array is amazing, but also expensive and cumbersome. If quality is the chief concern, this is the way to go.
The Sennheiser AMBEO, when compared to the PCMA-3D array, performed surprisingly well given its cost-effectiveness and ease of setup. But the tradeoff is a slightly more complex mix and a slightly less convincing immersive recording.
Both solutions were capable of producing a viable product.
Recording with some traditional mono and stereo techniques can augment spatial recordings and are still not only useful, but mandatory.