Immersive Audio

Microphone Shootout - Immersive Spaced Array

ORTF Stereo Pairs Neumann KM 184, Schoeps MK 41, Sennheiser MKH 50

The setup - three ORTF stereo pairs.

Intent

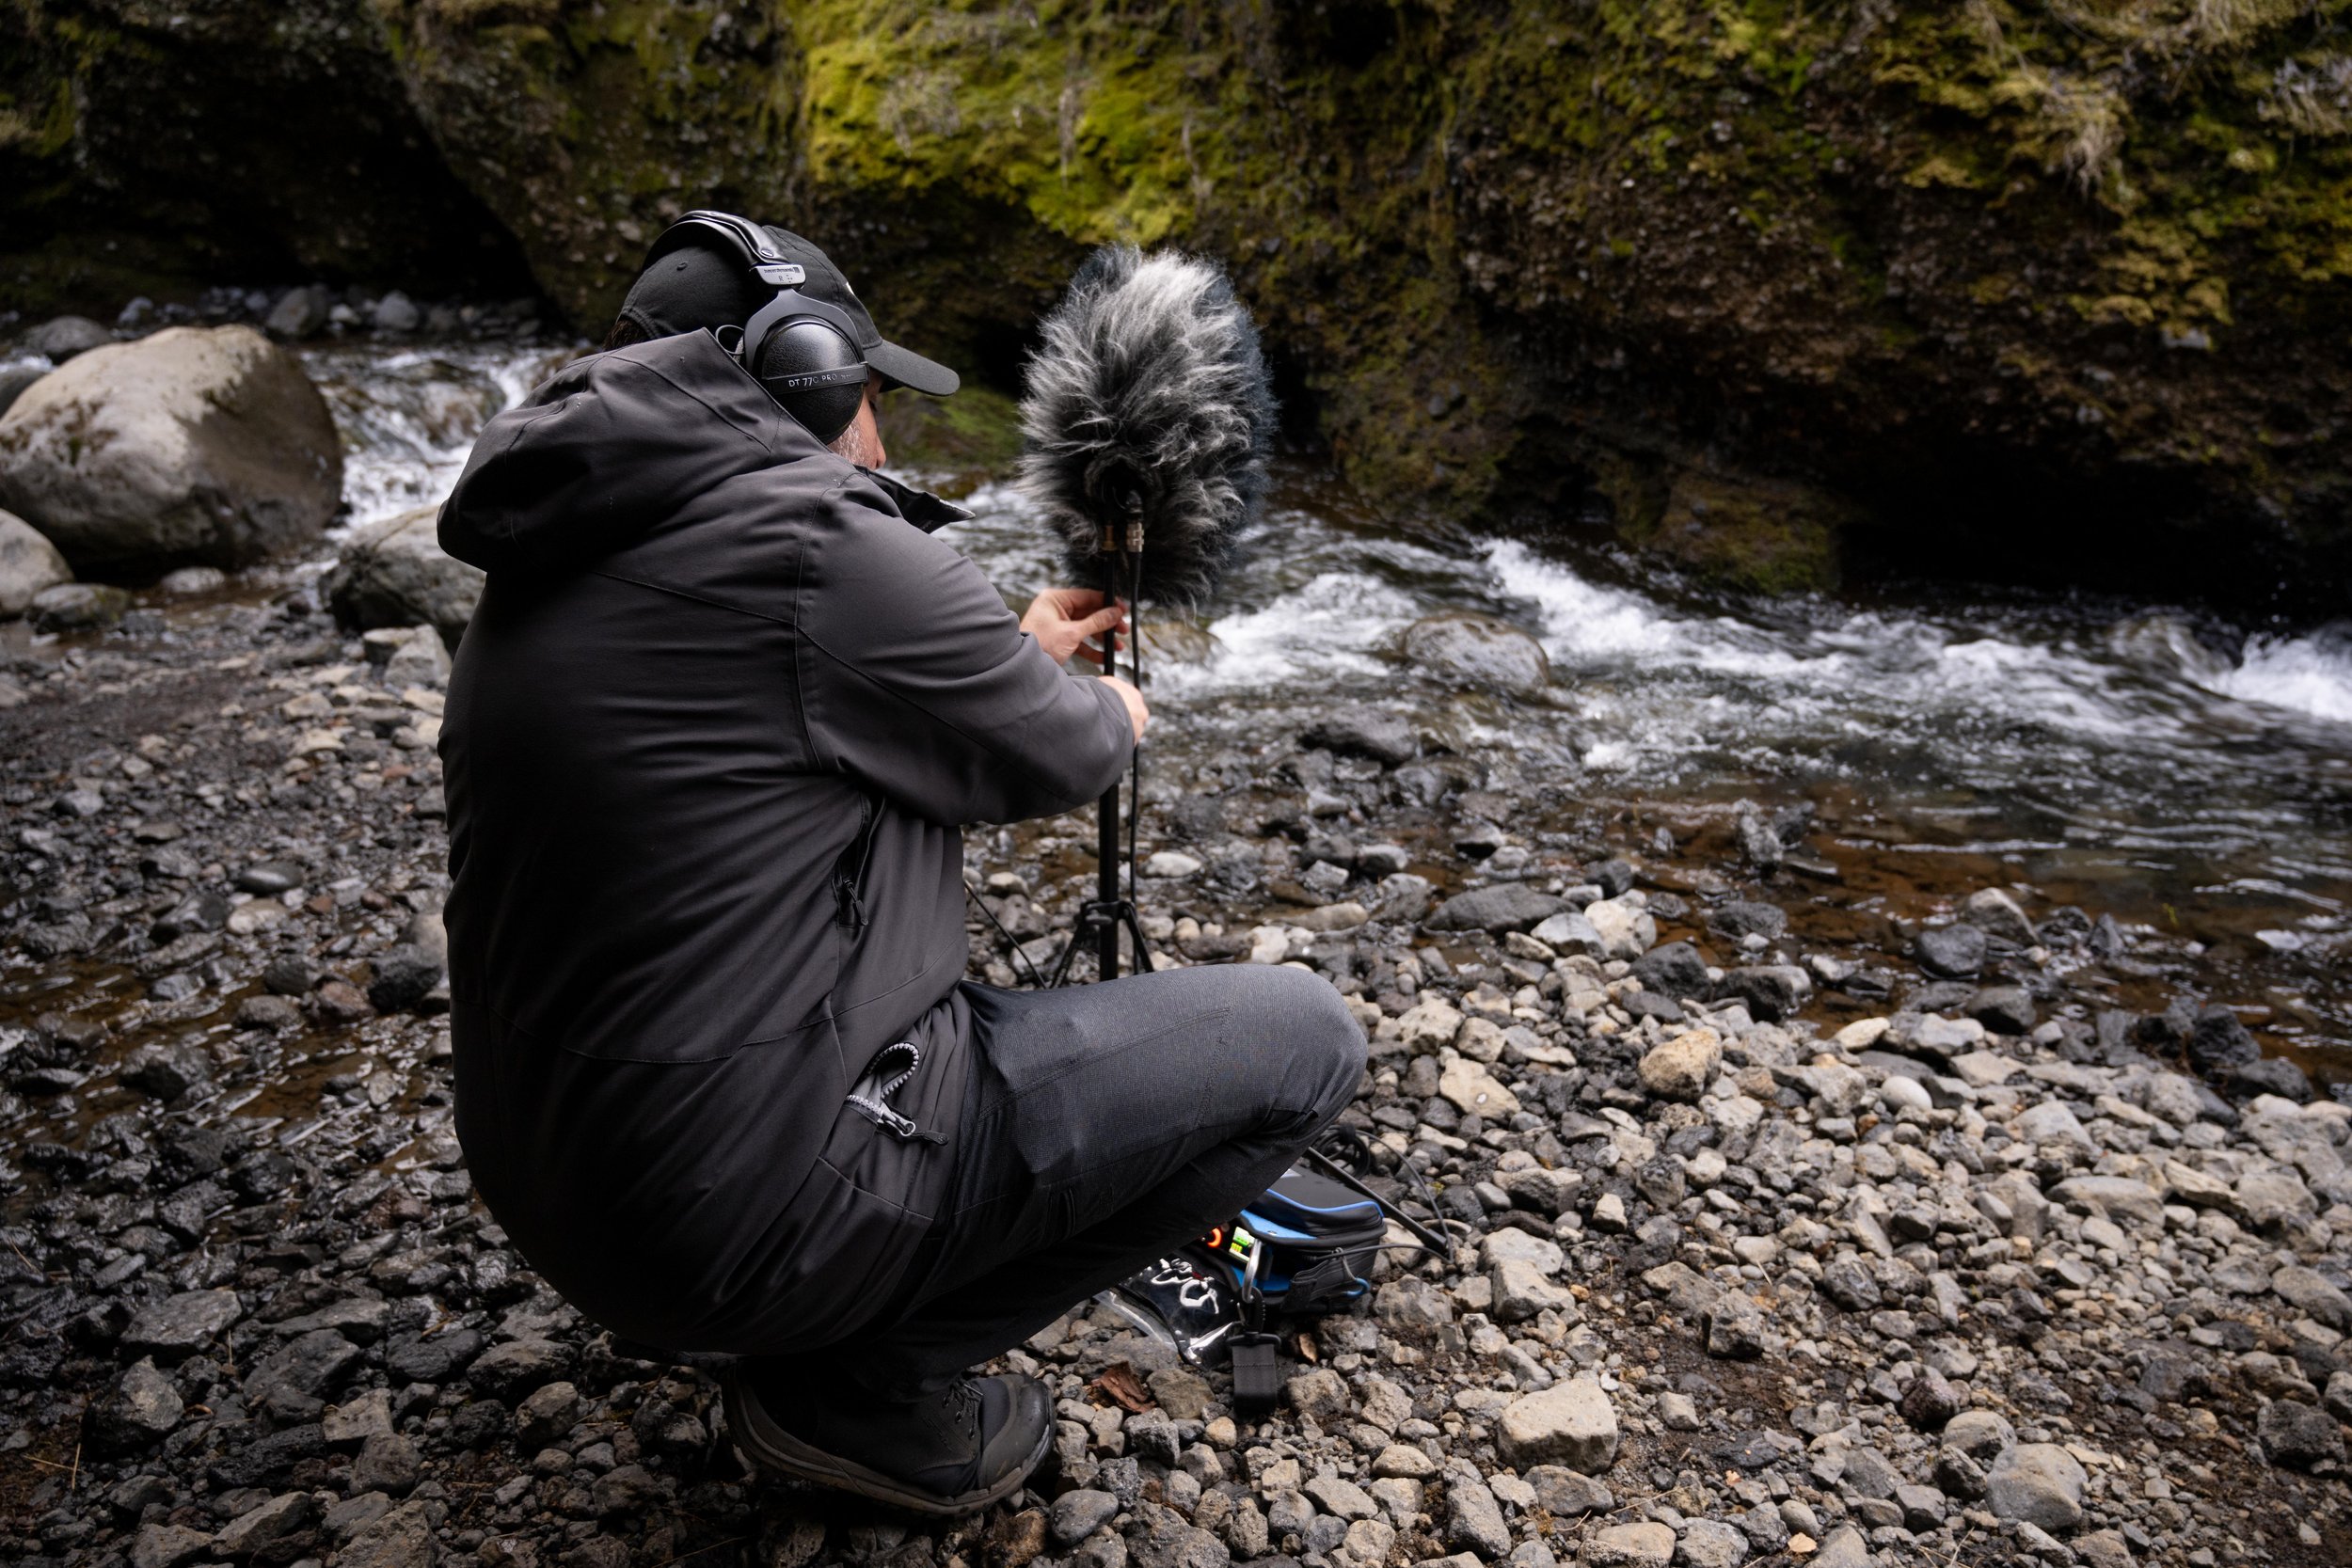
We’re working on expanding our immersive audio recording capabilities, particularly in the realm of immersive music.  One of the ways we’re looking to expand is into spaced microphone arrays.  Everything Blackguard Sound has commercially released up to this point has been recorded with coincident arrays (1st or 2nd Order Ambisonics).  There are many benefits to Ambisonics, but there are some tradeoffs, too.  We’re primarily concerned with the size of the sweet spot, which can be quite small.  Outside of that sweet spot phasing becomes apparent and it can feel a little dizzying.  We’re working on postproduction methods to decrease this effect, and the results are encouraging.  But one of the benefits of spaced arrays is a more stable, enlarged sweet spot.  That said, we will most likely continue to use Ambisonics mics for field recordings due to the obvious logistical challenges of bringing spaced arrays into the field.


We’ve experimented in the past with quad spaced omni (with meh results) and a proprietary technique devised in conjunction with Darren Schneider at Full Sail University.  This novel technique places the performer(s) in the center of 11 microphones at the Dolby recommended Atmos speaker placements, pointed inwards.  Then in post, each mic is converted into a Dolby Atmos object and panned to its placement in the room.  The results of this experiment were more encouraging.  The immersive image is very high fidelity and interesting, but perhaps hyper-real.  It almost places the listener inside the instrument or inside the performer’s perspective.  We thought it was pretty cool, but the feedback from classical music aficionados was almost exclusively ‘I am not used to that perspective, and I don’t think I can get used to it’.  So, our research into spaced arrays continues. 

Immersive Microphone Technique at Full Sail University

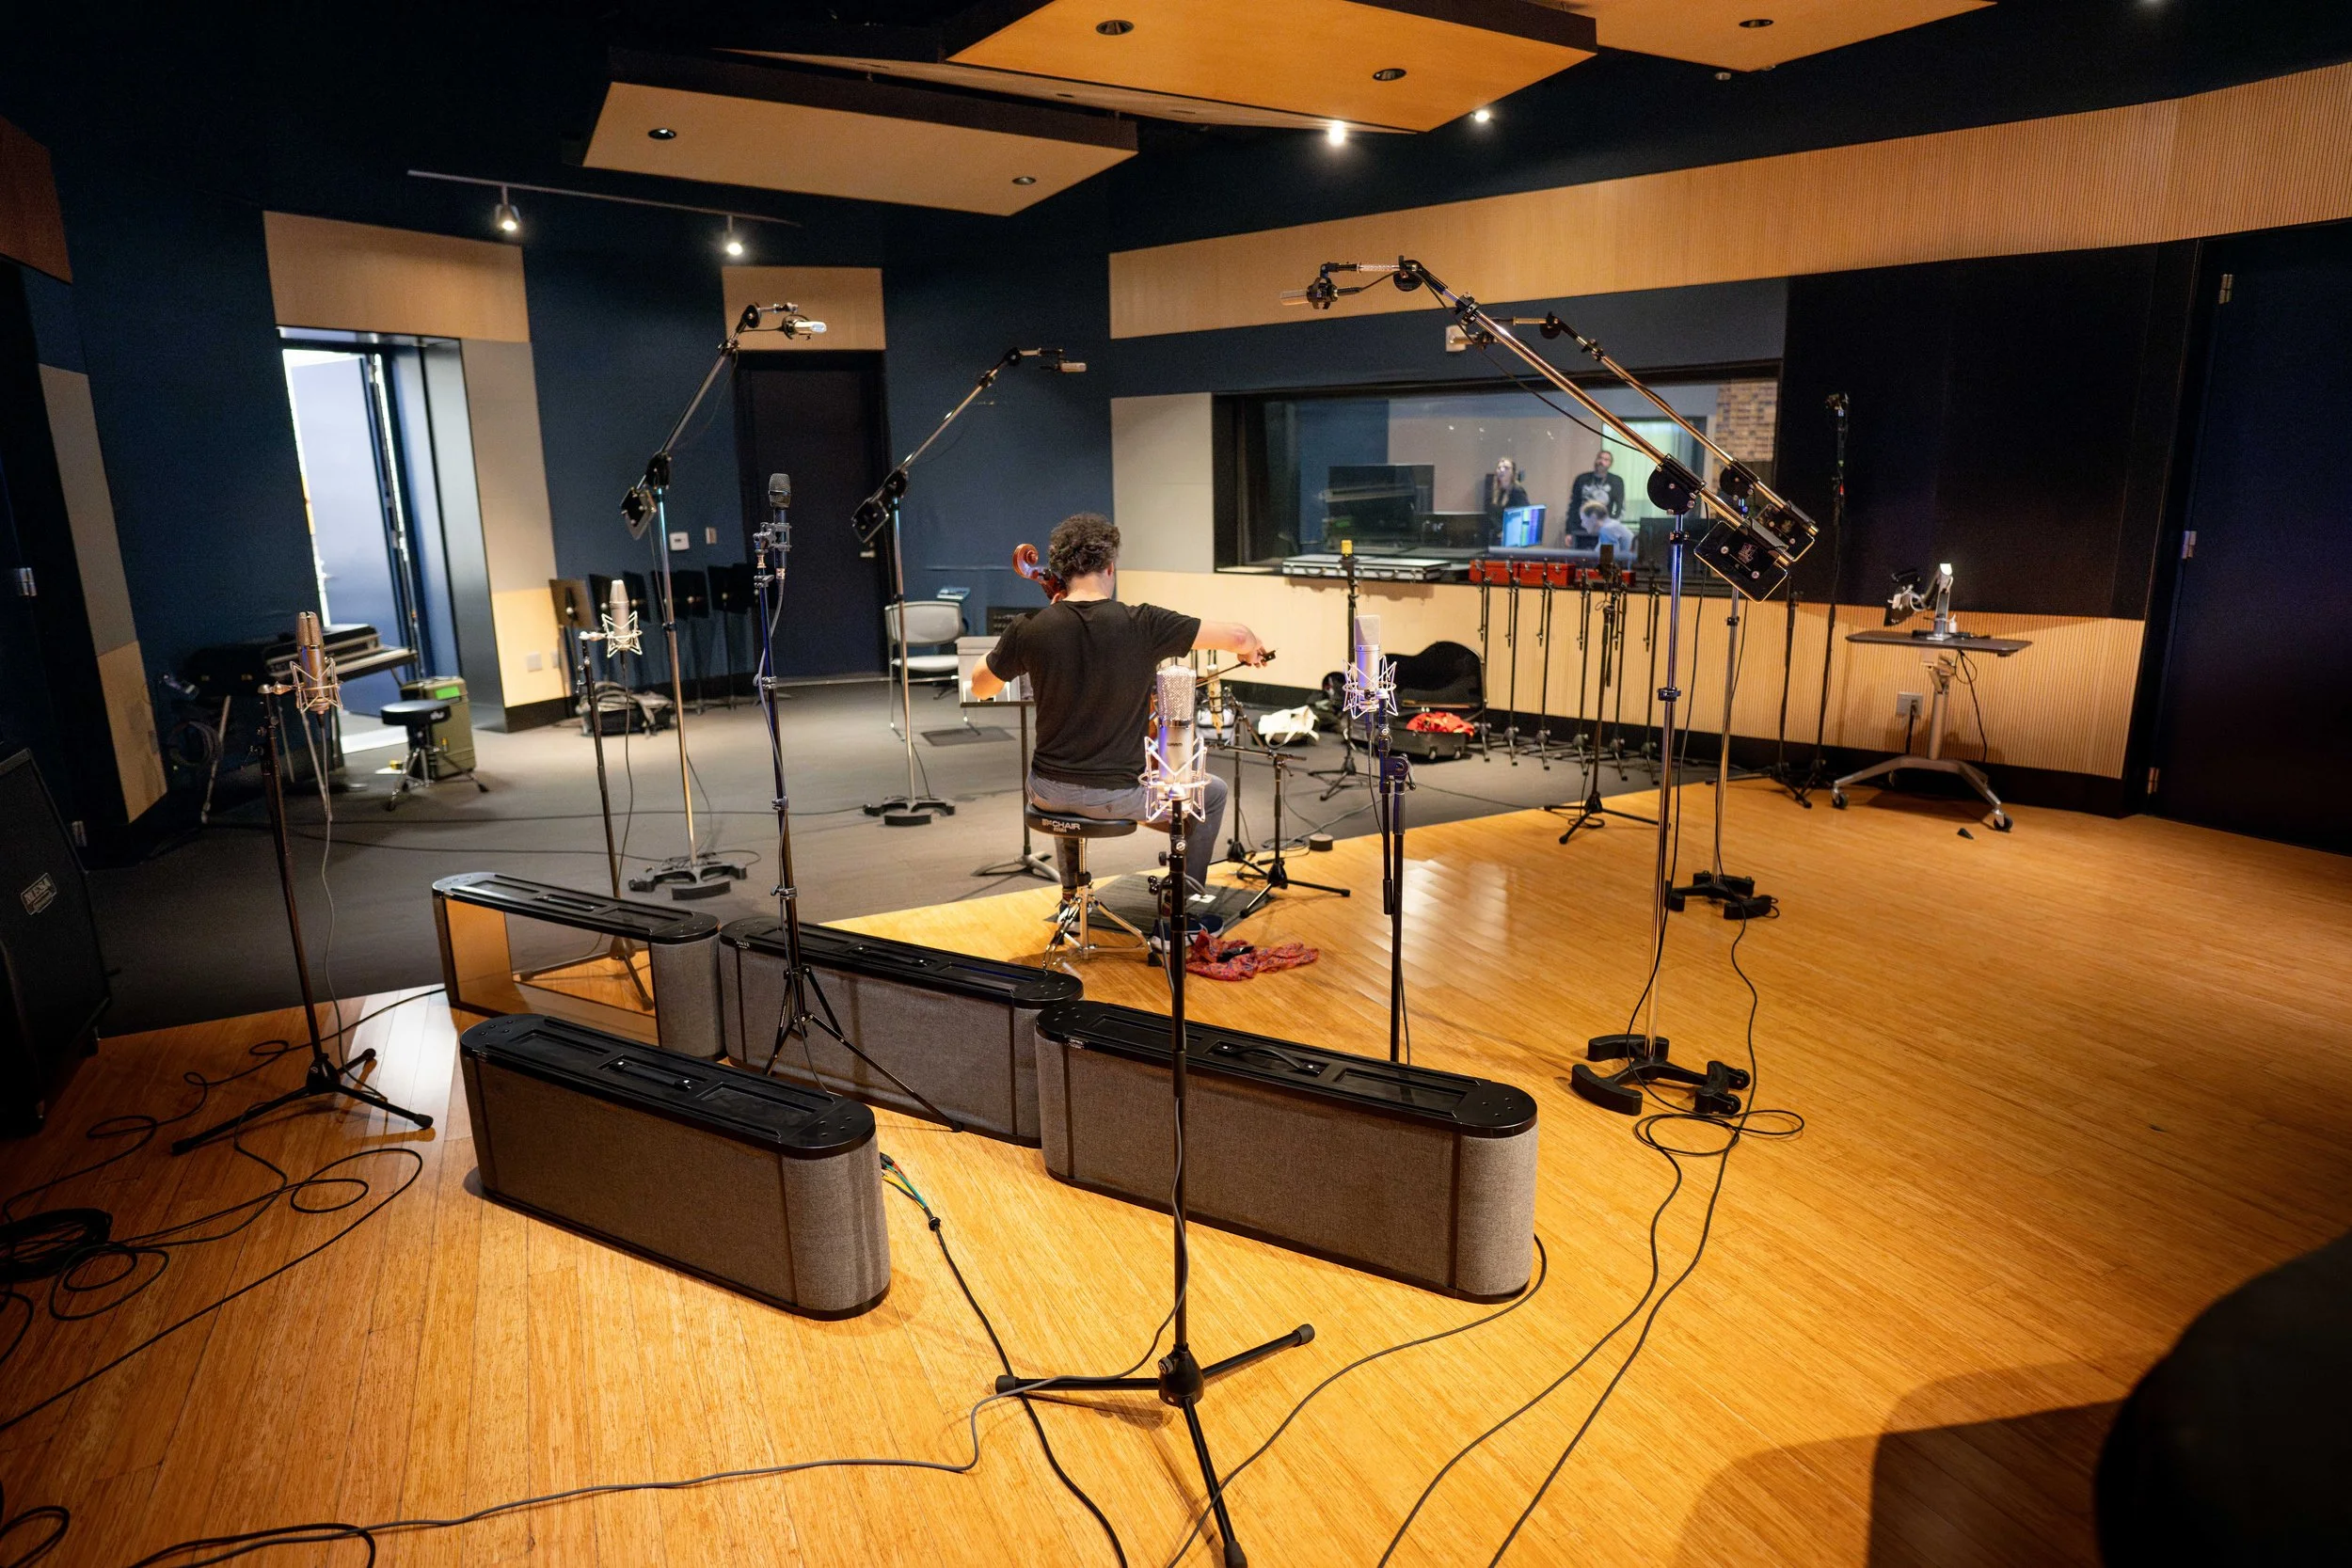
The Full Sail immersive mic technique in action


One spaced array in particular has sparked our curiosity.  The PCMA-3D (Perspective Control Mic Array) by Dr. Hyunkook Lee.  It’s influenced by existing classical music recording techniques but enhanced to be compatible with immersive audio.  This technique requires eleven mics (a mix of cardioids and super cardioids) arranged in a one-meter square with seven mics on the horizontal plane and four aimed upwards (coincident with the four corners of the square).  Phase one of our spaced array journey will be testing.  Phase two will be purchase and adoption.  Buying eleven high-end microphones is a substantial investment, so we will be renting mics for our initial experiments.  But even renting is an expensive proposition. - it will cost about $1,700 to rent eleven high quality mics for a week!  So, with that in mind we devised this microphone shootout between the three front-runners in the hopes of narrowing down our options.


The Three Options


Schoeps MK 4 / MK 41

These are the mics to beat.  We have a stereo pair of MK 41s, and they are our favorite mics for sound effects recording.  They have an uncanny ability to capture the space of a room.  On headphones, it’s a borderline immersive experience.  I have been genuinely startled while editing under headphones when an off-axis sound seemed to come from behind me.  Since the goal here is maximum immersion, it’s going to be tough to beat this mic.  There are two downsides to these mics, however.  The first is expense.  These retail for $2,000 each.  Multiply that by eleven and we’re looking at the cost of a reasonable new car.  The second is their susceptibility to humidity.   As much as we love these mics, it’s just not possible to use them outdoors here in Florida (or any other sub-tropical or tropical climate).  As stated above, we’ll probably continue using Ambisonics mics in the field, but if we’re going to spend a crazy amount of money on mics, we’d prefer to have the option of using them outside.  We used the MK 41 (super cardioid pattern) for this test.


Sennheiser MKH 8040 / MKH 8050

We have tons of experience with Sennheiser mics.  The AMBEO is our go-to mic in the field, and we’ve used MKH 50s and MKH 60s recording dialog on countless film sets.  The 8040 and 8050 are updated versions of that older generation.  The 80 series is meant to be interchangeable with the older mics, but we’ve heard anecdotally that this isn’t entirely the case.  However, for the purposes of this test we’re using the older MKH 50 since that’s what we have access to.  This approach may prove the be flawed, but I suspect these mics are close enough to help with our decision.  The upside of the Sennheisers is that they are slightly more affordable at $1,500 each.  Also, they are RF condensers, so their high humidity performance is immaculate.  Even if we aren’t utilizing the full array, we can use these mics in the field for a variety of other applications.  We used the MKH 50 (super cardioid) for this test.


Neumann KM 184 / KM 185

These are the wild cards.  The KM 184 is well known in the music industry but not widely used in sound effects.  I have used the Neuman KMR-8 shotgun mic for dialog.  Like the Schoeps, it does not deal well with humidity.  One time on a short film set, there was a company move from inside to outside.  I think the KMR-8 lasted about 20 seconds before it started sputtering from humidity!  But the Neumanns are well regarded for studio work, and their price point makes them much more attractive.  At $850 each, it’s a much more reasonable proposition to get eleven of these.  My main concern for studio work is a presence boost around 4K, where the other mics are reasonably flat.  There’s only one way to find out if that boost is going to be an issue!  We used the KM 184 (cardioid) for this test.   Yes, the other two mics in the test are super cardioid, but we live in an imperfect world.

Sennehiser MKH 50, Schoeps CMC6 MK 41, Neumann KM 184

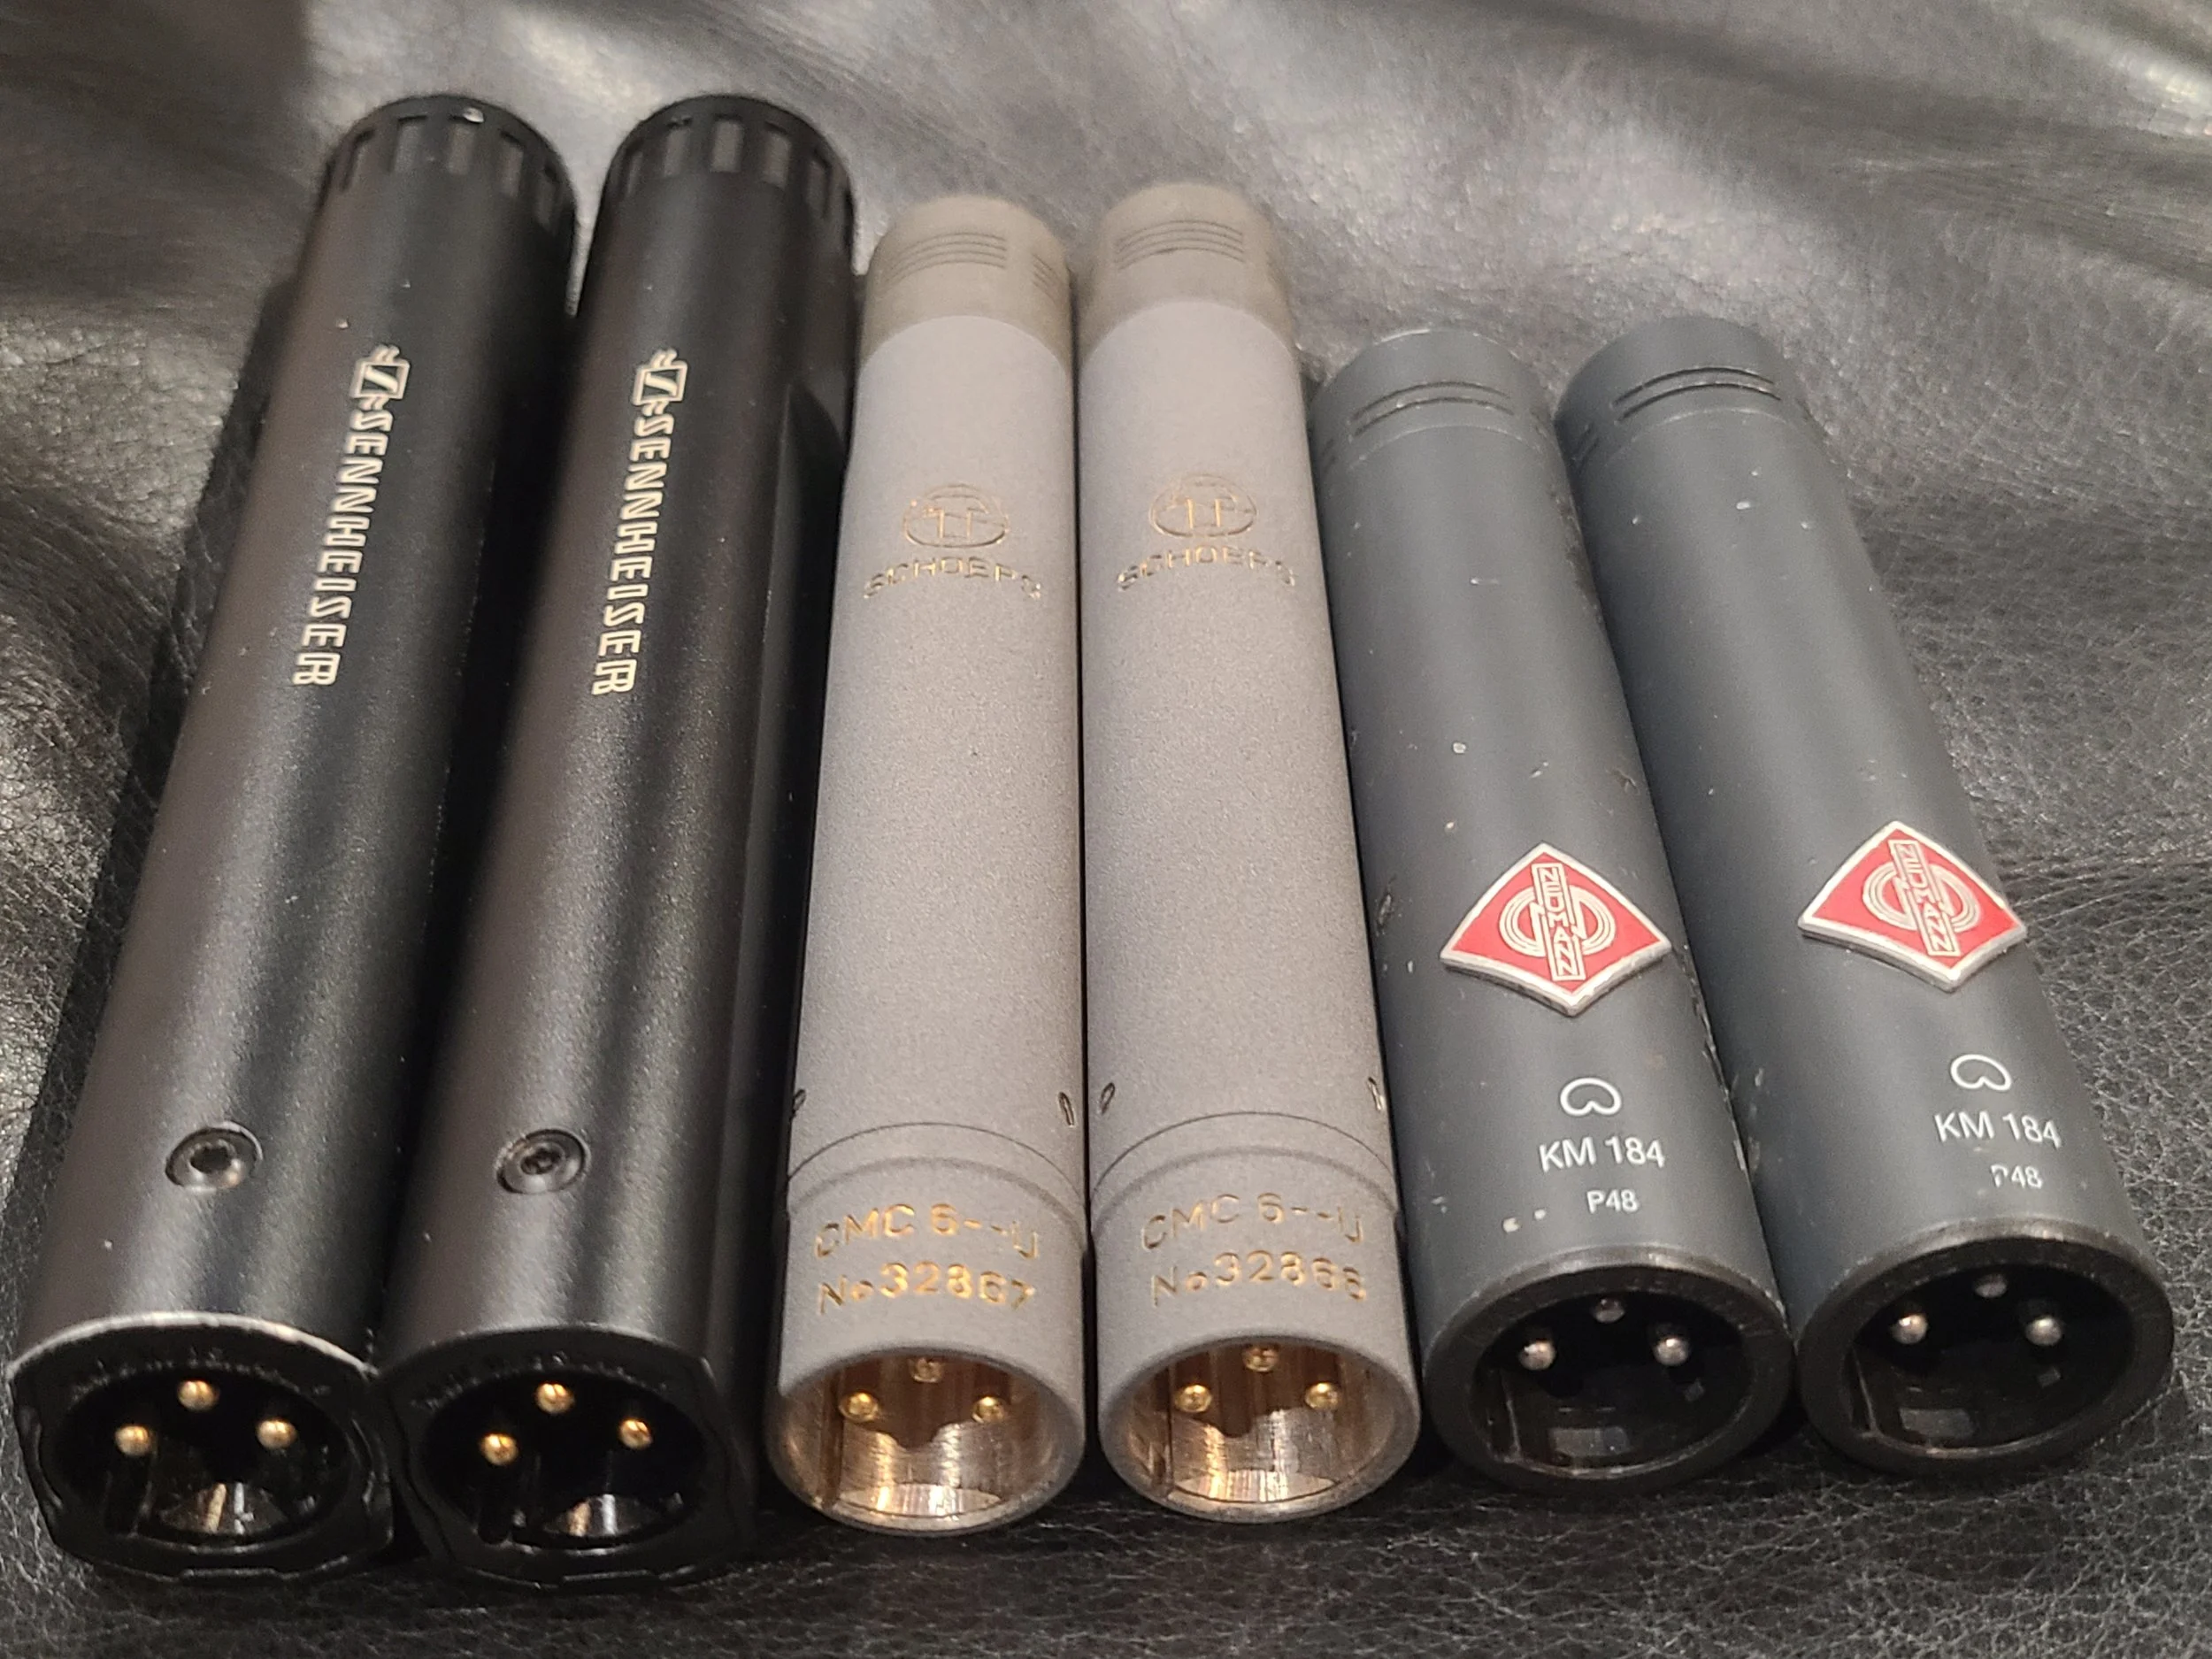
That’s a bunch of German mics.


Methodology


Placement

I decided to use ORTF placement for the three stereo pairs.  This is my personal favorite stereo technique.  My experience with the MK 41s is exclusively using them in ORTF configuration and this is how I’ve achieved borderline spooky imaging with them.  ORTF requires the mic capsules to be 17cm apart and at a 110-degree angle.  I tried to get them as close together as the mounting hardware would permit.  I was able to place the three ORTF pairs in a vertical stack approximately two inches apart.  I hope that’s close enough to not introduce any major variables.  The timing discrepancy between the earliest pair and the latest pair was less than 1ms, so they were very close.  To my mind, the more important variable was being able to record the exact same material on each pair simultaneously for the cleanest possible comparison.
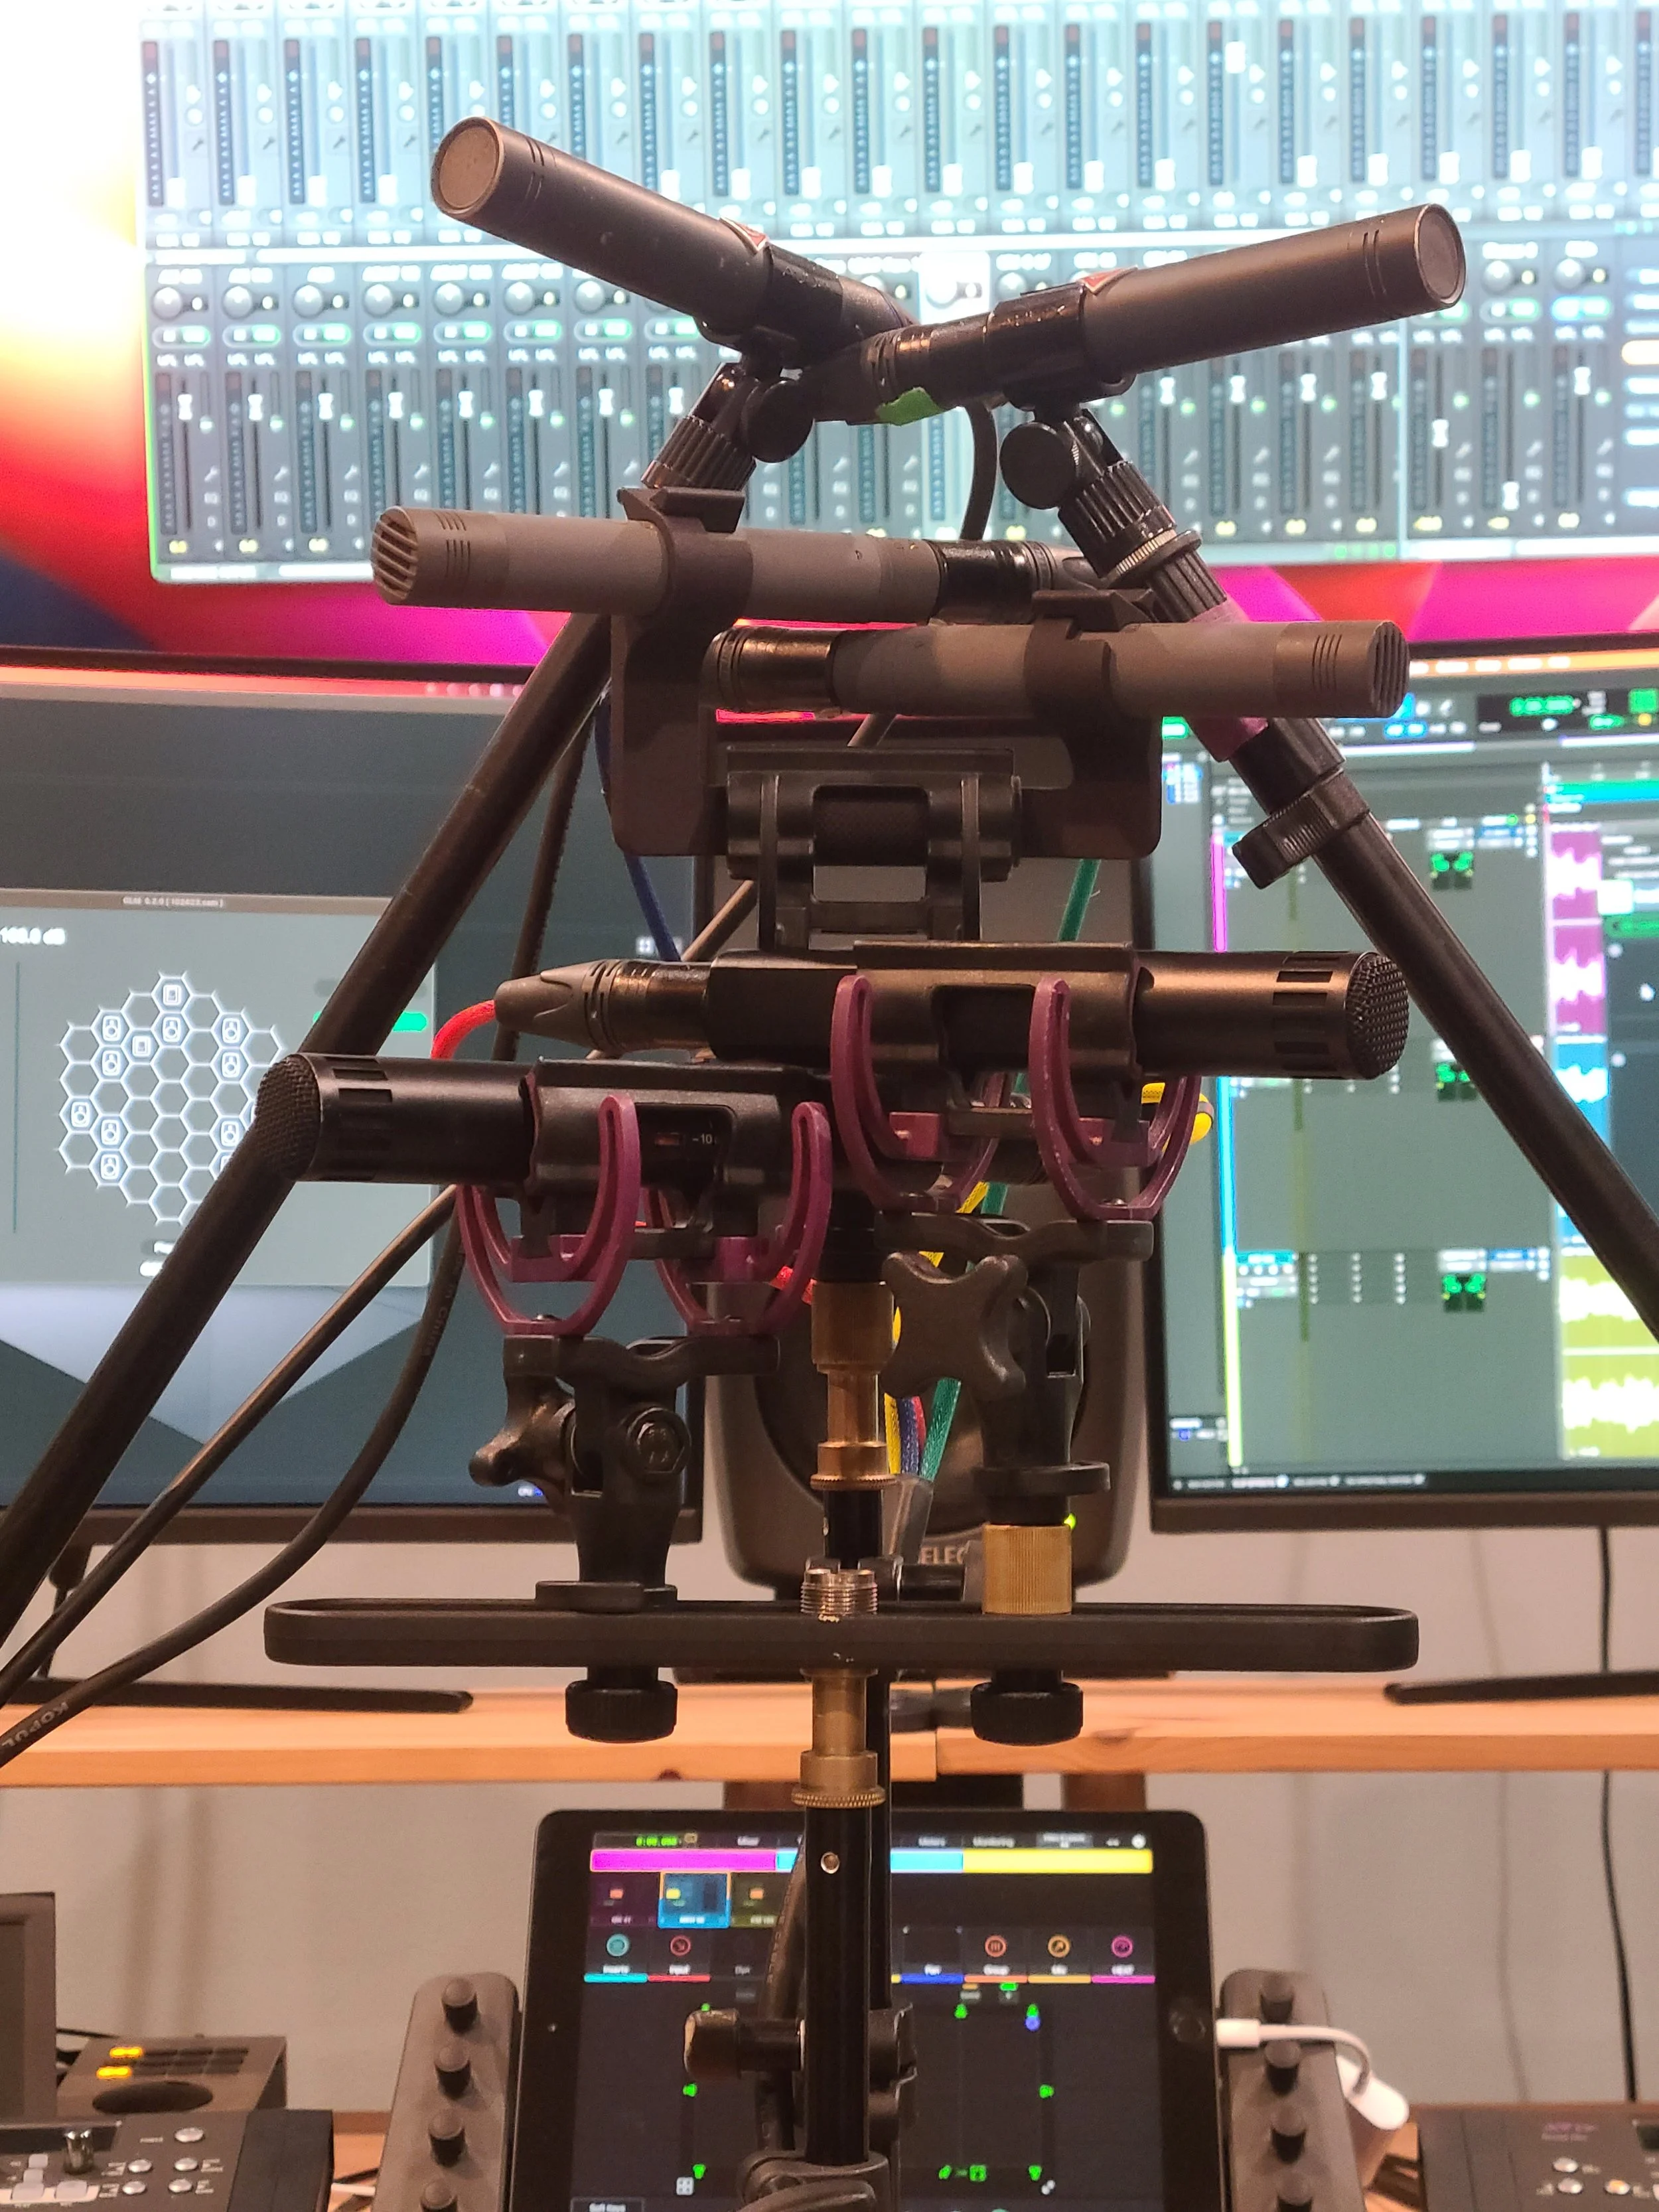
Three ORTF stereo microphone pairs

Detail of the setup


Amplification

This is the variable I was most concerned with.  For this test to work, the gain has to be identical for all six mics.  Ideally, the preamps would be digitally controlled.  My RME UFX+ only has four digitally controlled mic pres.  Our Sound Devices MixPre10 has 8 linkable preamps, but I didn’t want to have to dump files afterward or set it up to work as an interface.  My remaining option was to use a Sonosax SX-ES64, which is a high-end production mixer.  It has a unique 3-way gain selector (instead of a mic/line switch).  I set the switch to the mid setting and kept the gain knobs all the way down.  From there, I took six pre-fader outs and plugged them into a Ferrofish A/D converter.  It’s possible to link the gains on the Ferrofish, so I was able to ensure that all six mics got the exact same amount of gain.

Sonosax SX-ES64 Production Mixer

Sonosax Production Mixer

Ferrofish Pulse Gain Controls

Linked gains on A/D Converter


Test Material

I decided to use four very different sound sources to get the widest possible variety of volumes and timbres.  The four sound sources were: Alto Saxophone, Classical Guitar, Voice, and Percussion.  I then recorded each instrument at two different perspectives that I’m calling ‘near’ and ‘mid’.  Near was about five feet from the mic array and mid was about 15 feet away.  Blackguard’s studio space is not really intended for tracking acoustic instruments.  But it’s a treated room, and it’s relatively quiet so it’s not the worst.  While I wouldn’t want to use these recordings on an album, I think they’re perfectly fine for the sake of comparison.

Sound sources


Analysis

I recorded both performances of each instrument into Pro Tools.  Once I was done recording, I decided to measure the performance in two different ways.  The first way is objective analysis, measuring levels (pseudo) scientifically.  The second is subjective analysis using my ears to pick a favorite.

Pro Tools timeline immersive microphone shootout

Pro Tools timeline


Objective Measurement

I measured each recording using iZotope Insight 2.  I was looking at three things: Integrated LUFS, True Peak, and Noise Floor.  The integrated LUFS gives me an idea of the mic’s output.  The True Peak (when compared to the integrated LUFS) gives me a rough sense of dynamic range.  Those two measurements are straightforward.  The noise floor measurement is probably flawed, but it is an ‘apples to apples’ real-world comparison.  In each recording, I made sure to remain perfectly quiet for about five seconds.  I then separated this ‘silence’ into a new clip and measured the LUFS again.  However, the LUFS meter doesn’t do great with very quiet recordings, so I raised the clip gain of these ‘silent’ clips by 12dB to get a reliable measurement.  The studio isn’t exactly an anechoic chamber but given the same source material and same gain the only variable SHOULD be the mic’s inherent self-noise. 

Screenshot of iZotope Inisght 2

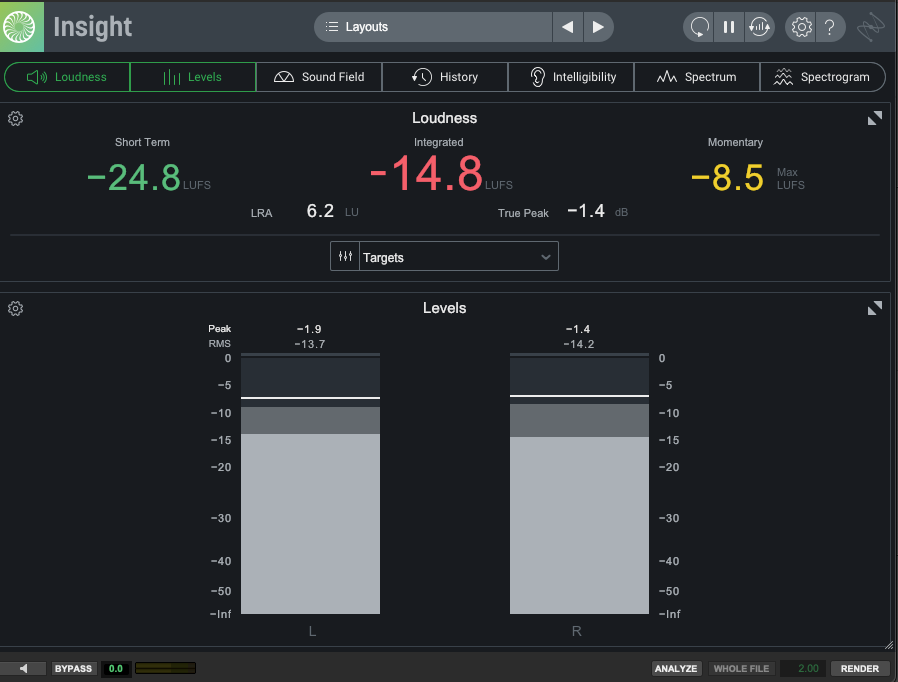
Insight 2 measurement

Screen shot of Pro Tools audio clip

Detail of noise floor measurement


Objective Results

I bet a real acoustician would eviscerate this analysis, but for my needs I feel I got some good information.  For example, the MKH 50 was WAY hotter than the other two.  The MK 41 consistently had the lowest output.  The KM 184 had the lowest noise floor and the most dynamic range.  These things were true across nearly all instruments and perspectives.   Surely, there’s value in this intel.

Spreadsheet showing results of microphone shootout

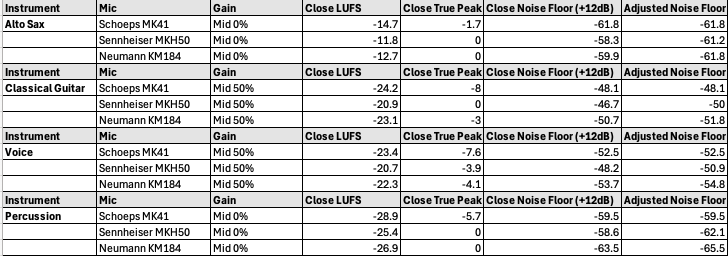
Some objective measurements


Subjective Measurement

I decided to evaluate each mic pair on two subjective aspects: tone and space.  Tone being the frequency response of the mic and the resulting attractiveness on each source instrument.  Space being how convinced I was by the spatial imaging.  This was the biggest benefit of recording in our studio.  I know the space well and it was very easy to hear the difference in each pair’s spatial performance.  I assigned a rating to each mic for every instrument and perspective:  one for my favorite, three for my least favorite.  The mic with the lowest score wins the subjective analysis.

Spreadsheet showing subjective results of microphone shootout

Subjective grading


Subjective Results

The MKH 50 was the easy winner in the tone category.  The highs are clear and articulated without being harsh.  As an added bonus, the MKH50 (and the 8050) extend well into ultrasonic frequencies – not relevant to this test but as a sound designer I’m a fan.  The MKH 50 also had the best low-end response of any of the mics.  This was especially apparent on the percussion recording and I feel the other two mics really lost something in this regard.  The MK 41 and the KM 184 were much closer to each other, tonally.  I preferred the MK 41, but only slightly (there was only a two-point difference between them). Given the price difference between these two mics, I was pleasantly surprised by this.


The MK 41 was the clear winner in the space category.  It has a nearly magical way of making the space feel authentic.  I suspected the MK 41 was special in this regard and the results of this test confirmed my suspicion.  The KM 184 was the next best, but I still preferred the MK 41 by a nearly 2:1 margin. The MKH 50 lagged far behind the other two.  When compared directly to the Schoeps mics, the Sennheisers practically collapsed to a phantom center that feels like a single point as opposed to really feeling the width and depth of the room.

So, there’s a bit of a problem here.  The MKH 50 was my favorite from a tone perspective, but my least favorite from a space perspective!  What were the final combined scores?  Maybe that will help…The KM 184 finished last with 35 points.  The MKH 50 finished second with 32 points.  The MK 41 finished first with 27 points.  OK – so we have a winner but it’s not a blowout.

Spreadsheet showing subjective results of microphone shootout

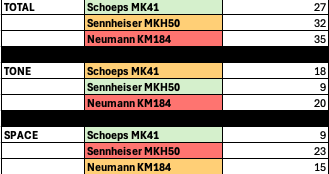
Final results - overall, tone, and space - low score wins


Synthesis and Key Takeaways

The MKH 50 was the outlier – it consistently felt like a totally different beast on every source.  If this decision was based purely on tonal quality the MKH 50 would have run away with the victory.  However, the whole point of this exercise is to evaluate these mics for use in an immersive array and the MKH 50 lagged far behind the others in this regard.  Despite all the other things the Sennheiser mics have going for them, I think they need to be excluded from consideration. Perhaps this is unfair, and we need to acquire a pair of the newer 8050s for truly fair testing…

The Schoeps MK 41 and the Neumann KM 184 felt much closer to each other.  The KM 184 was just a little harsher (that presence boost rearing its head) and a little narrower.  But I need to stress ‘a little’.  I had to really dig in and A/B a lot to come to this conclusion.  For me, this was a surprise for a couple of reasons.  First, the difference in polar patterns.  I was concerned about using the cardioid KM 184 for this experiment since the other two mics are super cardioid.  But it turned out to be less of a factor than I anticipated.  I’d really like to get ahold of a pair of Neumann KM 185s, which is the super cardioid version, and compare it against the MK 41.  I wonder if that mic would close the gap in the space category…

The technical specs were consistently quite good for the KM 184.  Lowest noise floor. Highest dynamic range.  Middle of the road output.  Least expensive by a lot.  Truly impressive.

This leaves us with a tough decision.  The MK 41 is my clear favorite.  But is it $1,100 better on a per-microphone basis?  Definitely not.  Let’s do some quick math.  A $1,100 price difference per microphone times eleven total microphones in the array comes to a $12,000 difference!  That’s going to be hard to stomach.  There’s an argument to be made that quality and results are all that matter.   I tend to agree with this sentiment, and I’ve never been one to shy away from spending up for professional tools.  However, the difference between these two mics is not that wide.  In the short term, I think we need to rent a pair of the Neuman KM 185s and do another shootout 1v1 with the MK 41s.  If the gap is closed even further this decision will get a lot easier.  For now, my intuition says the KM 184/ KM 185 combo is the right choice but stay tuned to see what we ultimately decide.

Zoom F3 Field Recorder Review

Blackguard Sound Field Recording Zoom F3 in the field.  Drop Rig, Immersice Audio

The Zoom F3 in the field.

Drop Rig Recording

We recently purchased a Zoom F3 field recorder.  Our primary use-case for this recorder is overnight drop rig recordings.  If you’re not sure what a drop rig is, recordists like George Vlad and Thomas Rex Beverly have written amazing guides on the subject.  Recently, our clients have been asking for 32-bit deliverables.  The need / use cases for 32-bit recordings are a whole other blog post, so we’ll get into that later.  Let’s concede, for now, that 32-bit is a requirement and leave it at that.  Anyway, our typical Sony drop rig recorders max out at 24-bit.  And while we love our 32-bit capable Sound Devices MixPres, they are too expensive to leave unattended in the wilderness for days at a time.  This predicament has left us searching for an affordable, reliable, 32-bit field recorder.  The Zoom F3 seems to fit the bill, but how does it perform?  

For overnight drop rig recording, one of the most important recorder specs is battery life.  An ideal scenario would play out like this:  We’d set up a drop rig in the afternoon on a Monday.  Then, we’d let it roll capturing the dawn choruses on both Tuesday and Wednesday mornings.  Finally, we’d retrieve it sometime mid-morning on Wednesday after the dawn chorus has played out.  So, we’d like to be able to roll non-stop from 4PM on a hypothetical Monday until 10AM on a hypothetical Wednesday.  That’s 42 hours of uninterrupted record time in our ideal scenario.

We have two Sony recorders that are up to this task.  The Sony PCM-D10 will do this easily with 4 AA Lithium batteries.  We don’t know what the upper limit is for this recorder because we’ve never hit it, and it’s not worth wasting a set of batteries to find out.  The legendary Sony PCM-D100 will also get there with 4 AA Lithiums.  Sadly, as stated earlier, neither of these workhorses can record 32-bit.  But, if 32-bit isn’t a required deliverable, both are great drop rig recorders (good luck finding a PCM-D100, though).

Blackguard Sound - Drop Rig, FIeld Recording, Immersive Audio

Drop Rig in the field (Zoom F3 not pictured).


Anker Power Bricks

An aside about Anker power bricks.  These are awesome for recording!  Paired with any recorder capable of receiving power over USB, these affordable batteries will give much more expensive smart batteries a run for their money.  That said, there are some confusing aspects of the Anker bricks, and the company doesn’t do the greatest job of making this plain.  There are typically three power modes per battery:

 PD (or Power Delivery)

This is a higher output, fast-charging mode.  This is usually the USB-C output.  If you want to charge your iPhone as fast as possible, this is the way to go.

IQ

This is an adaptive output that will sense the needs of your device and provide power accordingly.  If you want to power a device over a longer period of time, and don’t care about charging it, this is the way to go.  This is usually the USB-A output, so for many recorders you will need a USB-A to USB-C adapter cable. 

Trickle

This mode is for devices with extremely low power consumption, like earbuds.  In some cases, a device may draw so little power that the Anker Brick doesn’t realize there’s anything plugged in and it shuts off.  Trickle mode prevents the brick from shutting off for two hours.  Some recorders with an internal rechargeable battery (like the Sony PCM-A10) may run on trickle mode for a couple hours extra after the internal battery is fully charged.  Trickle mode is engaged by double-clicking the button on the battery so that one of the LEDs turns green.  Single click to exit trickle mode.  Trickle mode is not relevant to the tests that follow.

As we will see, these modes can make a huge difference, so be mindful of them.  IQ mode seems to be the winner for field recorder applications.

Blackguard Sound Field Recording, Zoom F3 Battery Life Test

Zoom F3 with the two Anker Power Bricks we tested (smaller 10k and larger 26.8k mA).


Zoom F3 Battery Life Test Results

How does the Zoom F3’s battery life compare?  Let’s find out.  All tests were performed with a stereo pair of Lom Usi Pros, two channels with 48v phantom power.  Recorder settings are 96K / 32-bit.  It is worth noting that battery run time WILL be impacted by the recorder settings as it takes more power to process higher sample rates and bit depths. The screen backlight is set to ‘off’.


Energizer AA Alkaline (x2)

1.6 hours.  Awful.  I wouldn’t use this recorder with alkaline AAs in any scenario.  It’s just creating e-waste.


Energizer AA Lithium (x2)

6.2 hours.  Underwhelming.  The Sony recorders take two more batteries but last at least seven times as long!  Using disposable batteries is not ideal, so the record time has to be amazing to justify the waste.


Anker PowerCore / 10,000 mA / PD (Power Delivery mode via USB-C)

12.0 hours.  Also underwhelming.  This is a compact brick, but I hoped for better.


Anker PowerCore / 10,000 mA / IQ (Adaptive mode via USB-A to USB-C)

12.8 hours.  Slightly better on IQ mode, extended runtime by approximately 7%.


Anker Power Bank / 26,800 mA / PD (Power Delivery mode via USB-C)

23.5 hours.  Still underwhelming given the size of this battery.  It’s larger than the F3!  This battery (in PD mode) has lasted at least 14 hours in a Sound Devices MixPre 6 running four channels w/ phantom, so I hoped for a better result on this test.

Anker Power Bank / 26,800 mA / IQ (Adaptive mode via USB-A to USB-C)

34.5 hours Now we’re getting somewhere.  The big takeaway here is to always use the IQ mode on your Anker power bank!  Just that one change added several hours of additional record time! Switching to IQ mode extended the runtime by about 47% in this case.  I’m not sure why the larger battery performed so much better on IQ mode then the 10K did but there was a marked improvement for both.


Battery Life Conclusions

Even in the best-case scenario, the Zoom F3 doesn’t last as long as we’d like it to, falling short of our 42-hour threshold.  That said, the Zoom F3’s battery life is suitable for MOST recording scenarios.  Imagine getting a full production day on a low budget film set from one 10,000mA low-cost power brick!  We will, however, continue to test other recorders.  Next up is the newer, more expensive Tascam FR-AV2


Zoom F3 Errata

Here are some other odds and ends we feel are worth mentioning to anyone considering a purchase:


Sound Quality

The sound quality is quite high, especially considering the low cost of entry.  The Zoom F series sounds substantially better than the Zoom H series, for example.  I think I prefer it over the various Sony recorders in the same price range.


Menu / UI

I found it to be clunky and counter intuitive.  For some reason, I keep expecting the menu navigation arrows to be in the opposite order.  Adjusting the waveform zoom or ‘gain’ is also tricky - I always mess it up the first time.  That said, these are first-world complaints.  It’s worth putting up with considering the value.


Plug-In Power / PIP

No Plug In Power 1/8 input.  This is a bummer since we love our Clippy PIP mics.  I bet the battery life would be better with those.


The Screen

There’s a nifty screen that shows a realtime waveform of your recording.  By default, the backlight stays on.  You can improve battery life by turning off the backlight, but not the screen itself, which is unnecessary beyond initial setup.  


Build Quality

Really nice.  It’s a chunk of metal.  It makes our Sony recorders feel cheap by comparison.  On par with Sound Devices.  We recently did a test droprig recording with the F3.  The test was supposed to be a relatively short overnight record, 12-14 hours long.  Due to circumstances beyond our control, we were unable to retrieve the recorder until about 44 hours after we placed it.  The humidity was at near 100% the entire time, which was expected.  Contrary to the weather forecast, it rained consistently for about 24 of those hours.  That part was NOT expected.  When we finally retrieved the droprig, the area was completely soaked.  The dry bag had been permeated and everything inside it was damp, at best – bordering on wet.  We placed the entire kit on silica for 8 hours, then turned it on.  Fortunately, everything still works!  So, the Zoom F3 recorded clean audio for over 34 hours in 100% humidity with steady rain for most of that time before the battery died.  It then sat unattended in the rain for an additional 10 hours but lived to record another day!


File Storage

It’s Micro SD, so pretty standard.  I wish it had an alternate storage method for in-the-field redundancy.  The Sony recorders have internal memory that will at least back up some of your data in the event of a catastrophic memory card failure.  The Sound Devices recorders have USB-A ports for large capacity thumb drives that offer amazing redundancy.  Also troubling - if the battery dies the currently recording file corrupts.  Imagine the battery dying in the middle of a crazy awesome dawn chorus and losing up to 46 minutes of solid gold!  BTW, 46 minutes is the approximate duration of each 96k/32-bit file since it caps out at 2GB (unlike many other recorders that cap out at 4GB).

Blackguard Sound - Field Recording, Immersive Audio

Zoom F3 just before getting some rough hours in the field.


Conclusion

Make up your own mind based on your intended usage, but we’re going to keep our Zoom F3.  There’s a chance it may sneakily be the best bang for the buck in field recording (under certain circumstances).  While the battery life could be improved and there are some other minor complaints, it has proven to be reliable in the field which makes it a winner in our book. 

Immersive Field Recording with the Sennheiser AMBEO

Blackguard Sound specializes in immersive field recording. We’ve tried several techniques including Double Mid Side, 1st Order Ambisonics, and 2nd Order Ambisonics. We’ve even experimented with recording a solo cello with 17 mics configured for immersive playback (but that’s a separate post)! Our current favorite solution is the Sennheiser AMBEO 1st Order Ambisonics mic. Read on to find out why the AMBEO is our go-to mic for projects all over the world.

Sennheiser AMBEO on location in Iceland

Why Sennheiser AMBEO?

Flexibility

We wanted the ability to deliver B-Format for immersive media, 5.1 or 7.1.4 for post, and stereo for YouTubers.  The Sennheiser AMBEO allows us to bring one mic and generate all of these assets without complicated (and heavy) mic bars, multiple stands, careful measurements etc. We’ve recorded in different surround formats over the years and AMBEO is the only thing portable enough for the tough locations we tend to record.

Sound quality

We’re very happy with AMBEO’s sound quality.  Low end power and high end details are equally well preserved.  Upon properly decoding to 7.1.4, the surround image is immersive and accurate.  Peers that have tried other Ambisonic mics are consistently impressed with what we get from the AMBEO.

Build quality

This is the big one! Sennheiser microphones are unmatched when it comes to harsh conditions. We’ve exposed our trusty AMBEO to some incredibly dangerous conditions over the years.  From the Florida Everglades in the summer to northern Iceland in a blizzard to literally being dumped on by a waterfall in Australia, it has held up beyond all reasonable expectations, oftentimes stuffed in a backpack or hand-carried out in the elements. On a recent trip to Northern California, a rogue wave knocked the entire stand, mic and all, into the Pacific Ocean. And yet the AMBEO survives. It is the undisputed Die Hard John McClane of microphones.

Jason setting up an AMBEO with Cinela Wind Protection in Thorsmork, Iceland

Recommended Accessories

12-Pin Extension Cable - 3 meter

The 12-pin to 4x XLR fanout cable is a sensitive spot in the setup.  I find the fanout cable to be susceptible to a high amount of handling noise.  The best way to avoid this is keep the fanout completely within the sound bag, which means you will need a long enough 12-pin extension to connect to the mic, run down the stand, and into the bag.

Cinela Piani AMBEO Windshield Kit

This product was a game changer for us!  The wind noise reduction is unbelievable.  It handles near gale-force winds with ease.  We pushed it to its limits (and a little beyond) in Iceland and I was honestly amazed at where that limit is.  The shockmount is incredible and the connbox eliminates virtually all handling noise.  Pricey, but worth every bit.  Also, be sure to check out the Piani Kelly Rain Cover.  We confidently recorded behind waterfalls and exposed in the rain knowing that the mic would be protected and the sound quality would be preserved.

Sound Devices MixPre 6 II

The perfect companion for the AMBEO.  The sound quality is impeccable and the Ambisonics plugin makes recording as easy as possible.  Direct conversion to B-Format saves a ton of time in post.  Linking the gain for all four inputs ensures good imaging.  Binaural monitoring gives us the confidence we need in the field.  It doesn’t hurt that it’s also extremely tough.

Screenshot of select plugins for Ambisonics mastering

Some of the best tools for mastering Ambisonics

Mastering Ambisonics

I’ve read some complaints in message boards about first-order Ambisonic recordings' ability to form a stable, immersive, multichannel image.  I believe that with careful mastering it is possible to achieve excellent results!  I’m currently decoding 1OA recordings to 7.1.4 and loving it. However, utmost care must be taken in the mastering process. Here are some things I’ve worked out through hard-fought trial and error:

First rule of Ambisonics!

Make sure you are keeping track of whether your B-Format is set to FuMa or AmbiX. It’s very easy to get this wrong and it will make the immersive image fall apart if your plugins are set to receive the wrong input type. AmbiX seems to be the more widely used flavor of B-Format and most plugins will default to that BUT ALWAYS CHECK!

Upscaling

The Audio Brewers ab Upscaler plugin is pure magic. It can take a 1st Order Ambisonics recording from the AMBEO (or any other 1OA mic) and upscale it all the way up to 7th order! The gains in spatial resolution are astounding. As a rule, I am highly skeptical of anything that claims to enhance an existing recording but Alejandro at Audio Brewers has figured out a way to do it in a simply breathtaking manner. Lately, I’ve been going up to 3rd Order (anything more and the number of channels gets a bit unwieldy) before decoding to my desired monitoring format. Just be sure to do any EQ or other processing BEFORE the Upscaler exponentially increases the number of channels!

Decoding

I use Audio Brewers ab HOA Decoder for decoding B-Format down to stereo, 5.1 or even 7.1.4. It is an amazing tool, but there are some important things to consider.  First, be sure to monitor in whatever format you are decoding to.  This will require that you do separate passes for the 7.1.4, 5.1 and 2.0 versions.  Do not assume that the settings for one decode will work for the other.  They often don’t!  Next, be sure to rotate the image all the way around to make sure you’re achieving balance and focus.  Despite my best efforts at mic setup, I rarely use zero degrees for the optimal ‘viewing’ angle.  Finally, don’t be afraid to mess with the mic spacing angle, especially in the stereo render.  Don’t be dogmatic - sticking to tried and true stereo miking methods - the best sounding result may be something unexpected.

EQ

I use Fabfilter Pro-Q3 for EQ duties.  First, it supports multi-channel formats, which rules out many other EQ plugins (however, it will not support 1OA except in multi-mono mode - please fix that Fabfilter!).  Next, it is a phase linear EQ, so it won’t mess with the time alignment of the 4 channels - very important if you want to preserve that immersiveness!  Finally, it has a dynamic EQ function which is essential.  I like to use a low shelf EQ set to dynamic mode to take care of intermittent bursts of low energy (like in wind or wave recordings) without sucking all the low end power out of the rest of the recording.  AMBEO-specific tip:  I find that the AMBEO has some buildup in the mid-500Hz range.  I like to scoop out 3dB in this area to compensate.  Be sure to use a light touch and listen carefully.  If your EQ notch is too narrow or too deep some negative artifacts will be introduced.  Never apply EQ without good reason and be mindful of the how and why.

Noise Reduction

I use iZotope RX for light noise reduction.  Rule number one - never apply broadband noise reduction to an Ambisonic recording!  There’s no quicker way to add artifacts, chirps, swirliness - whatever you want to call it.  I limit my RX use to a few surgical functions when performing Ambisonic mastering.  First, Spectral Repair, set to a conservative setting, can remove unwanted birds, ticks, clicks, pops and so on.  Don’t expect it to completely remove every unwanted sound.  You may have to concede that an unwanted sound will remain slightly audible or you may need to cut around it.  Listen carefully and LOOK carefully.  If Spectral Repair is cutting a hole in your spectrum, discerning ears will notice!  I also use De-Plosive to take care of intense low-end energy.  Be sure to set the frequency threshold based on the source material.  Avoid the temptation to use De-Wind.  It’s designed to remove wind noise from voice recordings - not wind recordings!  It will leave musical artifacts all over the place near the cutoff frequency, which is tolerable in location dialog, but never in a nature recording!

Sennheiser AMBEO on location Mendocino County, CA

In Conclusion

The Sennheiser AMBEO is a workhorse. Ambisonics recordings are underrated. Mic drop (don’t worry, it won’t break).

Check out our immersive ambience libraries or hire us for your next field recording expedition.